Usage
The usage of the ASFTM is really simple :). Run it and click on “Add” button to select files to convert.
These files could be f.e. a SAP or CMC files. Next you must select the destination directory for an output
file(s) that ASFTM will produce (click on “Browse” button).
OUTPUT FILE FORMAT BOX
 Here you can choose the output file format. You can select it from the box.
The set of possible output formats is as follows:
XEX, SAP, WAV, RAW, CMC,
MPD, RMT, TMC, TM8, TM2,
FC, CM3, CMR, CM3, CMS,
DMC, DLT.
If you want back to the original format (f.e. from SAP file to DMC) you can select the “Back to original format” option.
If you choose WAV or XEX as an output format you can also select “Include metadata” option.
OUTPUT FILE NAME BOX
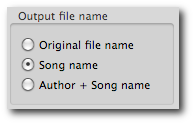 Also you can decide how to name the new, output files. You can choose:
“Original file name” – ASFTM will look on the source filename, and set the same name for the output file (only extension will be changed) (f.e. rage_against_16_bit.xex)
“Song name” – ASFTM will try to read the original song name from the source file, and set it as a name for a destination file (f.e. rage against 16bit.xex)
“Author + Song name” - the same as above + name of the author (f.e. x-rey – rage against 16bit.xex)
 MUTE POKEY CHANNELS BOX (for WAV or RAW output file)
Here you can mute POKEY channels (1-4 for songs in mono mode/1-8 for songs in stereo). It`s very useful option for DJ`s and any other people who want to extract separate channels from Atari songs. This way you can have f.e. drums line and melody in two separate WAV files!
SONG NUMBER AND LENGTH BOX (for SAP or WAV output file)
 With “Song no.” field you can choose number of subsong to convert. Sometimes music modules consist from a few subsongs. This option helps you to extract the subsong that you want.
In the “Lenght” field you can set the length of the destination song. Often songs are looped, so to avoid never ended WAV output file, you have to set the desired length of the song.
OUTPUT SAMPLES BIT DEPTH BOX (for WAV or RAW output file)
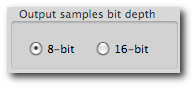
Here you can choose the sample bit resolution for output file (8-bit or 16-bit). 8-bit is set by default
RELOCATE MUSIC ADDRESS BOX (option for native modules – output format same as input format)
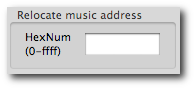 If you`re an Atari programmer you will be very happy to have an opportunity to relocate music to the given address. It`s the place in memory, into which the music will be loaded on real Atari. The “HexNum” field takes the hexadecimal number between 0 and ffff. Usually, just left this field empty.
When you start to convert files, the result of convertion procedure (for every file) will be displayed in the “Oldschool console” at the bottom of the application window.
